With the project set up, we can focus on adding features to the weather application we are building. In this episode, we populate the locations view.
Step by Step
Starting a project is often a bit overwhelming. Even if you have a spec and a design, it can be daunting to write those first lines of code. I have a flow that I use to break tasks up into smaller chunks of work. A chunk of work needs to be small enough for someone to easily identify the pieces of the puzzle. Let's take a look at the locations view.
There are a number of aspects we need to tackle. The locations view displays a list of locations. Those locations are stored in the user's defaults database. The user can add and remove locations. The locations view can have one of two states, empty or displaying locations. The locations view displays the locations in a vertical grid and each cell lazily fetches the current weather conditions. That's a lot of functionality packed into one view.
The good news is that we are using the Model-View-ViewModel pattern. MVVM enables us to separate view logic from business logic. The locations view can focus on presenting data and responding to user interaction. The view model takes care of preparing the data for its view.
We break the functionality of the locations view up into tasks and break each task up into easy to tackle chunks of work.
A Way of Working
The way I work has changed a little with the introduction of SwiftUI. Compared to UIKit, SwiftUI lets developers build the user interface quickly thanks to its declarative syntax and the short feedback loop previews offer.
I typically approach a task, such as building the locations view, as follows. First, I focus on the model layer. We need to have a model in place that we can present in the user interface. Second, we create the user interface and use stub data to populate the user interface. Third, we replace the stub data with live data by implementing the business layer.
Defining a Location
Create a group with name Models and add a Swift file to it. Name the Swift file Location.swift. We declare a struct with name Location. The Location struct defines several properties, id of type String to uniquely identify each location, name and country of type String to describe the location, and latitude and longitude of type Double to store the coordinates of the location.
import Foundation

struct Location {

    // MARK: - Properties

    let id: String
    let name: String
    let country: String

    // MARK: -

    let latitude: Double
    let longitude: Double

}
We plan to store the locations in the user's defaults database. We do that by converting the array of Location objects to a Data object. This is straightforward if the Location struct conforms to Codable. Conformance to the Encodable and Decodable protocols is generated for us.
import Foundation

struct Location: Codable {
	...
}
To populate the preview of the locations view, we need a few locations the locations view can display. We create an extension for the Location struct and declare a static, variable property with name previews of type [Location]. The computed property returns an array of Location objects.
extension Location {

    static var previews: [Location] {
        [
            .init(id: "1", name: "Paris", country: "France", latitude: 48.857438, longitude: 2.295790),
            .init(id: "2", name: "New York", country: "United States", latitude: 40.690337, longitude: -74.045473),
            .init(id: "3", name: "Cape Town", country: "South Africa", latitude: -33.957369, longitude: 18.403098)
        ]
    }

}
We also declare a static, variable property that returns the array of locations as a Data object. Declare a static, variable property with name previewsData of type Data. In the body of the computed property, we create a JSONEncoder instance to encode the array of locations. We pass the array of locations to the encode(_:) method of the JSON encoder, returning the resulting Data object. Notice that we use the try! keyword. This is fine since the operation shouldn't fail and the previewsData property is only used for previews.
extension Location {

    static var previews: [Location] {
    	...
    }

    static var previewsData: Data {
        try! JSONEncoder().encode(Location.previews)
    }

}
Populating the Locations View
Let's create a vertical grid to display the locations defined by the previews property. Open LocationsView.swift. Add a ScrollView to the NavigationView. The scroll view ensures the vertical grid we are about to add is scrollable.
var body: some View {
    NavigationView {
        ScrollView {

        }
    }
}
The content of the scroll view is a LazyVGrid, a vertical grid. The initializer accepts an array of grid items as its first argument, the spacing between the rows as its second argument, and the content of the vertical grid as its third argument. The array of grid items defines the size and position of the rows of the vertical grid.
We can keep the implementation simple. We pass an array with one grid item as the first argument. This is sufficient because it creates a vertical grid with rows that contain one item with a flexible size. This is comparable to a UIKit table view. We set the spacing between the rows to 20.0 points. The third argument is the content of the vertical grid.
var body: some View {
    NavigationView {
        ScrollView {
            LazyVGrid(columns: [GridItem()], spacing: 20.0) {

            }
        }
    }
}
To populate the vertical grid, we use the ForEach struct. We need to pass the initializer a collection of items and the type of the items needs to conform to the Identifiable protocol. Let's get to work.
Because we apply the Model-View-ViewModel pattern, the view model needs to provide the view with data to display. The locations view model shouldn't expose an array of locations to the view because the view shouldn't have direct access to the model layer. The view needs to display the array of locations, but it doesn't need to know what it displays. We hide the model layer by wrapping each location in a view model. Each view model drives an item of the vertical grid. Let me show you how that works. It isn't difficult.
Add a Swift file to the View Models group and name it LocationCellViewModel.swift. Declare a struct with name LocationCellViewModel. The struct conforms to the Identifiable protocol because that is a requirement of the ForEach struct.
import Foundation

struct LocationCellViewModel: Identifiable {

}
Like I said, the view model wraps a location. We declare a private, constant property, location, of type Location. We also define an initializer that accepts a Location object.
import Foundation

struct LocationCellViewModel: Identifiable {

    // MARK: - Properties

    private let location: Location

    // MARK: - Initialization

    init(location: Location) {
        self.location = location
    }

}
Because the view model doesn't expose the Location object, we define an API the view can use to display the location's details to the user. Declare a computed property with name locationName of type String. It returns the value of the location's name property. We also declare a computed property with name locationCountry of type String. It returns the value of the location's country property.
import Foundation

struct LocationCellViewModel: Identifiable {

    // MARK: - Properties

    private let location: Location

    // MARK: - Initialization

    init(location: Location) {
        self.location = location
    }

    // MARK: - Public API

    var locationName: String {
        location.name
    }

    var locationCountry: String {
        location.country
    }

}
The compiler throws an error because the LocationCellViewModel struct doesn't meet the requirements set by the Identifiable protocol. We need to define a property with name id that uniquely identifies a LocationCellViewModel object. This is simple. Define a computed property with name id and type String. In the body of the computed property, we return the identifier of the Location object.
import Foundation

struct LocationCellViewModel: Identifiable {

    // MARK: - Properties

    private let location: Location

    // MARK: - Identifiable

    var id: String {
        location.id
    }

	...

}
Open LocationsViewModel.swift and declare a computed property with name locationCellViewModels of type [LocationCellViewModel]. In the body of the computed property, we create an array of locations by accessing the static previews property of the Location struct we implemented earlier. The computed locationCellViewModels property is of type [LocationCellViewModel], which means we need to map the array of locations. We invoke the map(_:) method on the array of locations, passing in a reference to the initializer of the LocationCellViewModel struct.
import Foundation

struct LocationsViewModel {

    // MARK: - Properties

    var title: String {
        "Thunderstorm"
    }

    var locationCellViewModels: [LocationCellViewModel] {
        Location.previews.map(LocationCellViewModel.init)
    }

}
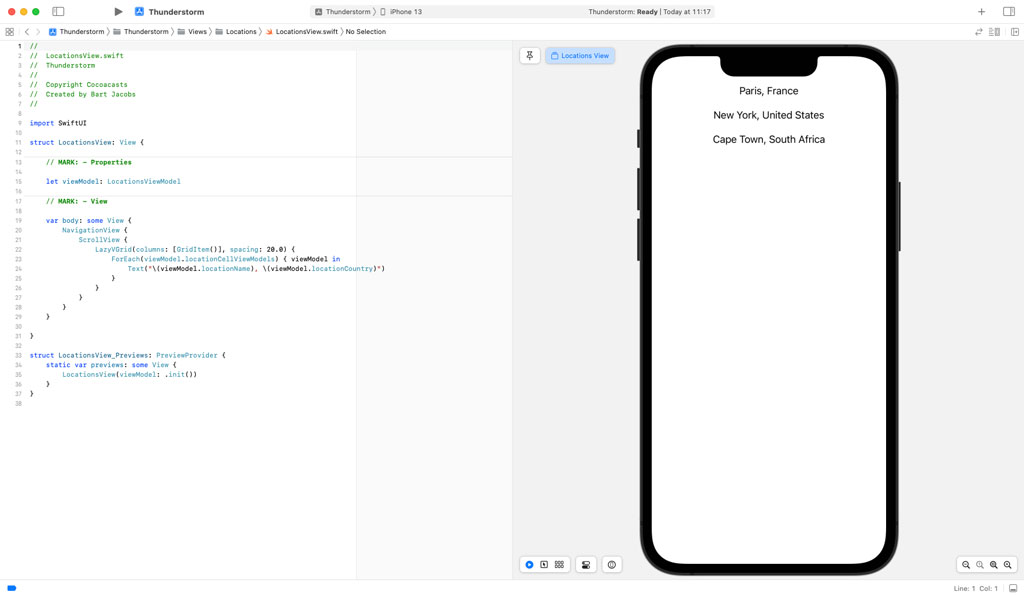
Revisit LocationsView.swift. We can now ask the view model for an array of view models and pass that array to the initializer of the ForEach struct. The initializer accepts a view builder as its second argument. The view builder, a closure, accepts an item of the array of view models. Let's keep it simple for now and return a Text view that displays the location's name and country.
var body: some View {
    NavigationView {
        ScrollView {
            LazyVGrid(columns: [GridItem()], spacing: 20.0) {
                ForEach(viewModel.locationCellViewModels) { viewModel in
                    Text("\(viewModel.locationName), \(viewModel.locationCountry)")
                }
            }
        }
    }
}
The preview on the right displays the three locations we defined earlier.
What's Next?
Believe it or not, we took care of most of the complexity in this episode. In the next few episodes, we can take advantage of the foundation we laid in this episode. We need to expand the API of the LocationCellViewModel struct and create a view for each item of the vertical grid. In the next few episodes, you also learn what the advantages are of using the Model-View-ViewModel pattern in a SwiftUI project.