The playground has been useful to create a prototype of the APIClient class. It's time to integrate the Episode struct and the APIClient class into the project. That is the focus of this episode.
Adding the Episode and APIClient Types
Before we integrate the APIClient class into the project, we add the Episode struct to the project. We create a group with name Models and add a Swift file with name Episode.swift to the Models group. We copy the implementation of the playground to Episode.swift. We remove the public keyword because the Episode struct doesn't need to be defined publicly in the project.
import Foundation

struct Episode: Decodable {

    // MARK: - Properties

    let id: Int
    let plus: Bool
    let title: String
    let excerpt: String
    let author: String
    let thumbnailUrl: URL
    let collection: String?
    let publishedAt: Date

    let swift: Int
    let xcode: Int
    let platformName: String
    let platformVersion: Int

}
We create another group with name Networking and add a subgroup with name API Client to the Networking group. We add a Swift file to the API Client group and name it APIClient.swift. We copy the implementation of the playground to APIClient.swift and remove the public keywords. The APIClient class, its methods, and the types it defines don't need to be defined publicly in the project.
import Foundation

final class APIClient {

    // MARK: - Types

    enum APIClientError: Error {
        case requestFailed
        case invalidResponse
    }

    // MARK: -

    private enum Endpoint: String {

        // MARK: - Cases

        case episodes

        // MARK: - Properties

        var path: String {
            return rawValue
        }

    }

    // MARK: - Properties

    private let apiKey: String

    // MARK: -

    private let baseUrl: URL

    // MARK: - Initialization

    init(apiKey: String, baseUrl: URL) {
        // Set Properties
        self.apiKey = apiKey
        self.baseUrl = baseUrl
    }

    // MARK: - Public API

    func fetchEpisodes(_ completion: @escaping (Result<[Episode], APIClientError>) -> Void) {
        ...
    }

    // MARK: - Helper Methods

    private func request(for endpoint: Endpoint) -> URLRequest {
        ...
    }

}
Before we continue, we add an import statement for the CocoaLumberjack library at the top and replace the print statements in the fetchEpisodes(_:) method with DDLogError statements.
import Foundation
import CocoaLumberjack

final class APIClient {
    ...
}
// MARK: - Public API

func fetchEpisodes(_ completion: @escaping (Result<[Episode], APIClientError>) -> Void) {
    // Initialize and Initiate Data Task
    URLSession.shared.dataTask(with: request(for: .episodes)) { (data, response, error) in
        if let data = data {
            do {
                // Initialize JSON Decoder
                let decoder = JSONDecoder()

                // Configure JSON Decoder
                decoder.dateDecodingStrategy = .iso8601
                decoder.keyDecodingStrategy = .convertFromSnakeCase

                // Decode JSON Response
                let episodes = try decoder.decode([Episode].self, from: data)

                // Invoke Handler
                completion(.success(episodes))
            } catch {
                // Invoke Handler
                completion(.failure(.invalidResponse))
            }

        } else {
            // Invoke Handler
            completion(.failure(.requestFailed))

            if let error = error {
                DDLogError("Unable to Fetch Episodes \(error)")
            } else {
                DDLogError("Unable to Fetch Episodes")
            }
        }
    }.resume()
}
Model-View-ViewModel-Coordinator
The next step is deciding which object instantiates the APIClient instance and which object owns the APIClient instance. These questions are easy to answer since the project adopts the Model-View-ViewModel-Coordinator pattern.
The feed view controller needs a view model and the coordinator that instantiates the feed view controller is responsible for injecting the view model into the feed view controller. This may sound complex if you're not familiar with the MVVM-C pattern. The implementation is straightforward, though. Let's break it down into digestible steps.
Creating a View Model
We create a group with name View Models in the Modules > Feed group. We add a Swift file to the View Models group and name it FeedViewModel.swift. We define a class with name FeedViewModel and prefix the class definition with the final keyword.
import Foundation

final class FeedViewModel {

}
The FeedViewModel class defines a private, constant property, apiClient, of type APIClient. The APIClient instance is injected into the feed view model during initialization. We could put the FeedViewModel class in charge of creating the APIClient instance, but I prefer to inject dependencies whenever possible. It makes unit testing much easier.
import Foundation

final class FeedViewModel {

    // MARK: - Properties

    private let apiClient: APIClient

}
This means that the next step is defining an initializer that accepts an APIClient instance. The feed view model keeps a reference to the APIClient instance in its apiClient property.
import Foundation

final class FeedViewModel {

    // MARK: - Properties

    private let apiClient: APIClient

    // MARK: - Initialization

    init(apiClient: APIClient) {
        // Set Properties
        self.apiClient = apiClient
    }

}
Injecting the View Model
Open FeedViewController.swift and define a variable property, viewModel, of type FeedViewModel?. Because we use storyboards, we have no other option but to define the viewModel property as a variable property of type FeedViewModel?. We could define the viewModel property as an implicitly unwrapped optional, but that's a pattern I tend to avoid.
import UIKit

class FeedViewController: UIViewController, Storyboardable {

    // MARK: - Storyboardable

    static var storyboardName: String {
        return "Feed"
    }

    // MARK: - Properties

    var viewModel: FeedViewModel?

    // MARK: - Initialization

    required init?(coder aDecoder: NSCoder) {
        super.init(coder: aDecoder)

        // Set Title
        title = "Feed"
    }

}
It's time to create and inject the view model into the FeedViewController instance. Let's revisit the FeedCoordinator class in FeedCoordinator.swift. We no longer define the feedViewController property as a constant. We define feedViewController as a lazy, variable property instead.
import UIKit

class FeedCoordinator: Coordinator {

    // MARK: - Properties

    var rootViewController: UIViewController {
        return feedViewController
    }

    // MARK: -

    private lazy var feedViewController: FeedViewController = {

    }()

}
We need to initialize several objects. The initializer of the FeedViewModel class requires an APIClient instance. The APIClient class requires an API key and a base URL. We start by creating the base URL. This should look familiar. Don't worry about the exclamation mark. We resolve this red flag later in this episode.
private lazy var feedViewController: FeedViewController = {
    // Initialize Base URL
    let baseUrl = URL(string: "http://0.0.0.0:3000/api/")!
}()
The base URL is used to create the APIClient instance. The API key is passed to the initializer as a string literal. I don't like random string literals floating around in a project. We clean the implementation up later in this episode.
private lazy var feedViewController: FeedViewController = {
    // Initialize Base URL
    let baseUrl = URL(string: "http://0.0.0.0:3000/api/")!

    // Initialize API Client
    let apiClient = APIClient(apiKey: "9e8d3f9fd2ce713bb1ca8e60021e09d0dc6fb654", baseUrl: baseUrl)
}()
We pass the APIClient instance to the initializer of the FeedViewModel class.
private lazy var feedViewController: FeedViewController = {
    // Initialize Base URL
    let baseUrl = URL(string: "http://0.0.0.0:3000/api/")!

    // Initialize API Client
    let apiClient = APIClient(apiKey: "9e8d3f9fd2ce713bb1ca8e60021e09d0dc6fb654", baseUrl: baseUrl)

    // Initialize Feed View Model
    let viewModel = FeedViewModel(apiClient: apiClient)
}()
We invoke the instantiate() method on the FeedViewController class to create the feed view controller and set its viewModel property. We return the FeedViewController instance from the closure. Don't forget to append the trailing pair of parentheses to execute the closure.
private lazy var feedViewController: FeedViewController = {
    // Create Base URL
    let baseUrl = URL(string: "http://0.0.0.0:3000/api/")!

    // Initialize API Client
    let apiClient = APIClient(apiKey: "9e8d3f9fd2ce713bb1ca8e60021e09d0dc6fb654", baseUrl: baseUrl)

    // Initialize Feed View Model
    let viewModel = FeedViewModel(apiClient: apiClient)

    // Initialize Feed View Controller
    let feedViewController = FeedViewController.instantiate()

    // Configure Feed View Controller
    feedViewController.viewModel = viewModel

    return feedViewController
}()
Let's test the implementation by invoking the fetchEpisodes(_:) method in the initializer of the FeedViewModel class. We print the number of episodes if the API request is successful and we print the error if anything goes wrong.
import Foundation

final class FeedViewModel {

    // MARK: - Properties

    private let apiClient: APIClient

    // MARK: - Initialization

    init(apiClient: APIClient) {
        // Set Properties
        self.apiClient = apiClient

        // Fetch Episodes
        apiClient.fetchEpisodes { (result) in
            switch result {
            case .success(let episodes):
                print(episodes.count)
            case .failure(let error):
                print(error)
            }
        }
    }

}
Let's build and run the application in the simulator and inspect the output in the console. The output confirms that we successfully integrated the APIClient class into the project.
20
Improving the Implementation
If I want to switch from the development environment to staging or production, I need to modify the API key and the base URL in FeedCoordinator.swift. That is far from ideal. There is a much better solution and we laid the foundation earlier in this series. Let's open Environment.swift in the Configuration group. This is what the implementation currently looks like.
import Foundation

enum Environment: String {

    // MARK: - Environments

    case staging
    case production

    // MARK: - Current Environment

    static let current: Environment = {
        // Read Value From Info.plist
        guard let value = Bundle.main.infoDictionary?["CONFIGURATION"] as? String else {
            fatalError("No Configuration Found")
        }

        // Extract Environment
        guard let rawValue = value.split(separator: "/").last else {
            fatalError("Invalid Environment")
        }

        // Create Environment
        guard let environment = Environment(rawValue: rawValue.lowercased()) else {
            fatalError("Invalid Environment")
        }

        return environment
    }()

    // MARK: - Base URL

    static var baseUrl: URL {
        switch current {
        case .staging:
            return URL(string: "https://staging.cocoacasts.com/api/")!
        case .production:
            return URL(string: "https://cocoacasts.com/api/")!
        }
    }

}
We can already ask an Environment object for its base URL. We need to make a few small changes. First, the Environment enum needs to support the development environment. Second, an Environment object should be able to return the API key for the current environment.
Adding the Development Environment
We start by adding a case with name development to the Environment enum.
import Foundation

enum Environment: String {

    // MARK: - Environments

    case staging
    case production
    case development

    ...
}
This means that we also need to update the implementation of the baseUrl static property. We add a case for the development environment and return the base URL of the development environment.
// MARK: - Base URL

static var baseUrl: URL {
    switch current {
    case .staging:
        return URL(string: "https://staging.cocoacasts.com/api/")!
    case .production:
        return URL(string: "https://cocoacasts.com/api/")!
    case .development:
        return URL(string: "http://0.0.0.0:3000/api/")!
    }
}
The next step is adding a static property for the API key. We define a static, variable property, apiKey, of type String. We return a different API key for each environment.
// MARK: - API Key

static var apiKey: String {
    switch current {
    case .staging:
        return "1bb7a1a05b30ac1ae897258f15b0a1c63fa62ea7"
    case .production:
        return "08b3b2b574dfe3571205678453ae33599e79bf6a"
    case .development:
        return "9e8d3f9fd2ce713bb1ca8e60021e09d0dc6fb654"
    }
}
With the implementation of the Environment enum updated, it's time to revisit the FeedCoordinator class. The feed coordinator can now ask the Environment enum for the API key and the base URL for the current environment. This looks much better.
private lazy var feedViewController: FeedViewController = {
    // Initialize API Client
    let apiClient = APIClient(apiKey: Environment.apiKey, baseUrl: Environment.baseUrl)

    // Initialize Feed View Model
    let viewModel = FeedViewModel(apiClient: apiClient)

    // Initialize Feed View Controller
    let feedViewController = FeedViewController.instantiate()

    // Configure Feed View Controller
    feedViewController.viewModel = viewModel

    return feedViewController
}()
Switching Environments
It's important to make switching environments as painless as possible. You don't want to update a build setting or a configuration file every time you switch environments. Remember from earlier in this series that switching environments is as simple as selecting a scheme. We have the Cocoacasts/Staging scheme and the Cocoacasts/Production scheme. We only need to add a configuration for the development environment and create a scheme.
Click the project in the Project Navigator and select the Cocoacasts project on the left. Because we don't plan to create a release build for the development environment, we only need to add one configuration. Click the + button below the list of configurations and choose Duplicate "Debug/Staging" Configuration. Name the new configuration Debug/Development.

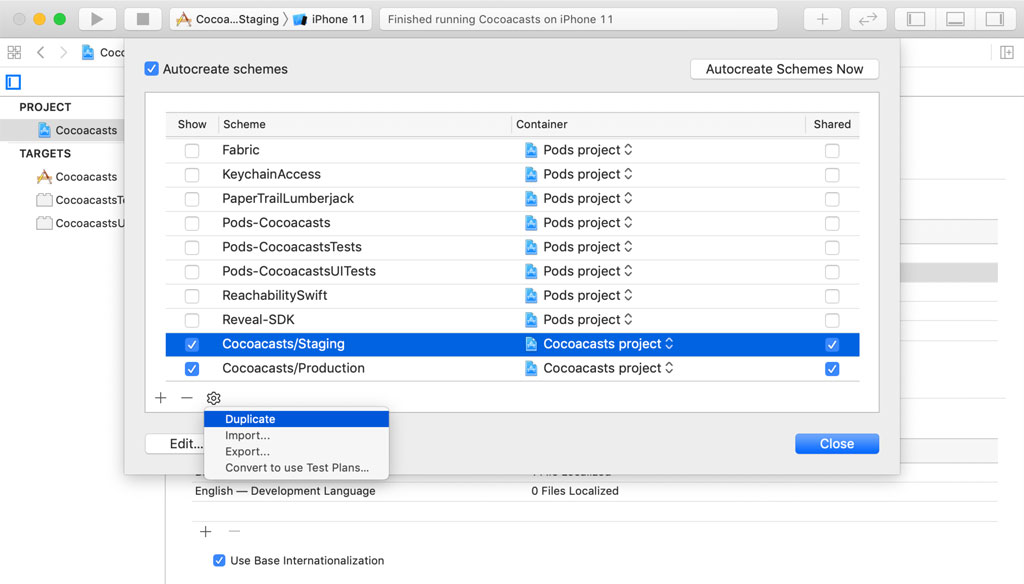
Click the active scheme in the top left and choose Manage Schemes.... Select the Cocoacasts/Staging scheme, click the gear icon at the bottom, and choose Duplicate.
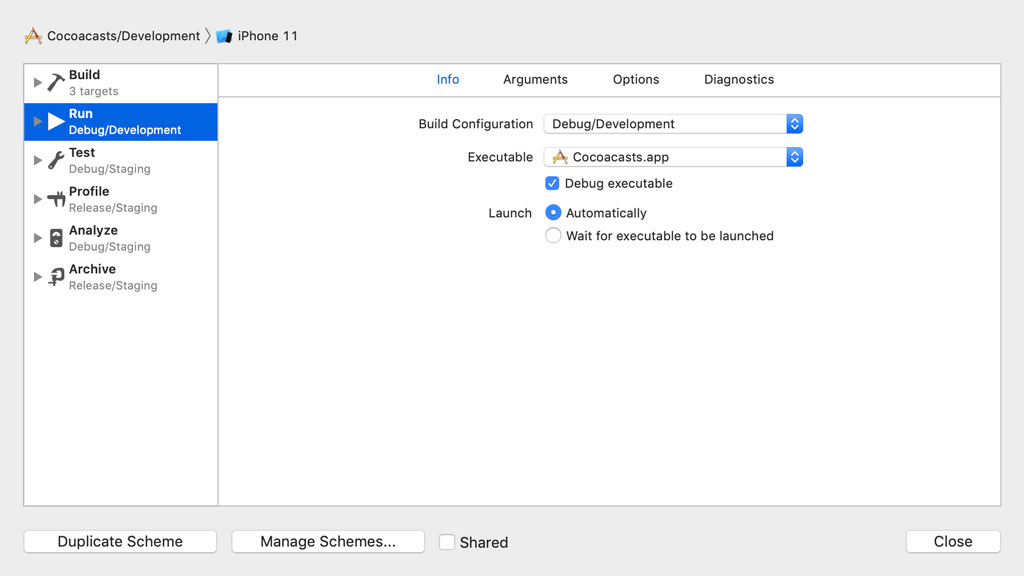
Name the new scheme Cocoacasts/Development and set Build Configuration to Debug/Development. Click the Close button in the bottom right to commit the changes.
Make sure the Cocoacasts/Development scheme is selected. Build and run the application in the simulator and inspect the output in the console. You should still see the number of episodes the API client fetched from the local Cocoacasts API.
20
We also need to update the project's Podfile. Close the workspace and open the project's Podfile in a text editor. The Reveal SDK needs to be installed for the Debug/Staging, Debug/Production, and Debug/Development configurations.
target 'Cocoacasts' do
  platform :ios, '12.0'
  use_frameworks!
  inhibit_all_warnings!
  ...

  # Development
  pod 'Reveal-SDK', configurations: ['Debug/Staging', 'Debug/Production', 'Debug/Development']

  ...
end
Make sure to run bundle exec pod install from the command line to update the Pods project.
What's Next?
Integrating the APIClient class into the project wasn't difficult and that is in part thanks to the Model-View-ViewModel-Coordinator pattern. The MVVM-C pattern clearly defines the responsibilities in the project.
The view controller should only be concerned with managing its view and responding to user interaction. The view controller's view model owns the APIClient instance and the coordinator that instantiates the view controller creates the view model and injects it into the view controller.
By injecting the APIClient instance into the view model, we lay the foundation for a robust test suite. We start writing unit tests later in this series.