The application we're building is shaping up nicely. It's time to make it a little bit more functional. The application is currently only capable of fetching weather data for a predefined set of coordinates. This severely limits the appeal of the application.
In this episode, we use the Core Location framework to fetch the location of the device. The application will use that information to show the user weather data for their current location. That will make the application much more useful.
Apple is very strict about privacy and rightly so. An application isn't allowed access to the location of the device if the user hasn't explicitly given their permission. Even though requesting the user's permission is neatly handled by the Core Location framework, it requires a bit of work from us.
Creating a Location Manager
The project adopts the Model-View-ViewModel pattern, which means the view controller is only responsible for presenting data to the user and responding to user interaction. The view controller doesn't and shouldn't know about the Core Location framework. Fetching the location of the device is handled by the view model.
Open RootViewModel.swift and add an import statement for the Core Location framework.
import Foundation
import CoreLocation

class RootViewModel {

    ...

}
The application interacts with the Core Location framework through a location manager, an instance of the CLLocationManager class. We define a private, lazy, variable property, locationManager, of type CLLocationManager. We initialize and configure the CLLocationManager instance in a closure. The RootViewModel class acts as the delegate of the location manager.
private lazy var locationManager: CLLocationManager = {
    // Initialize Location Manager
    let locationManager = CLLocationManager()

    // Configure Location Manager
    locationManager.delegate = self

    return locationManager
}()
Because the property is marked with the lazy keyword, we can reference self in the closure. This isn't possible if we were to declare the property as a constant. The closure is executed by appending a pair of parentheses to the closure.
I like this technique for several reasons. The initialization and configuration of the location manager are kept close to the property declaration. It also helps to keep the initializer of the RootViewModel class short. We don't need to initialize the CLLocationManager instance in the initializer. And, last but not least, we can reference self in the closure. Lazy initializers are often used for objects that are expensive or time-consuming to create and you only want to create these objects when you need them. As you can see in this example, lazy properties also have other benefits and applications.
The compiler isn't too happy with the lazy property we created. It complains that the RootViewModel class doesn't conform to the CLLocationManagerDelegate protocol. Let's fix that.

Create an extension for the RootViewModel class at the bottom of RootViewModel.swift. We use the extension to conform the RootViewModel class to the CLLocationManagerDelegate protocol.
extension RootViewModel: CLLocationManagerDelegate {

}
Even though the extension conforms the RootViewModel class to the CLLocationManagerDelegate protocol, the compiler still complains. It notifies us that the RootViewModel class doesn't conform to the NSObjectProtocol protocol. What is that about?

The documentation shows us that the CLLocationManagerDelegate protocol inherits the NSObjectProtocol protocol. This means that the RootViewModel class needs to conform to the NSObjectProtocol protocol.
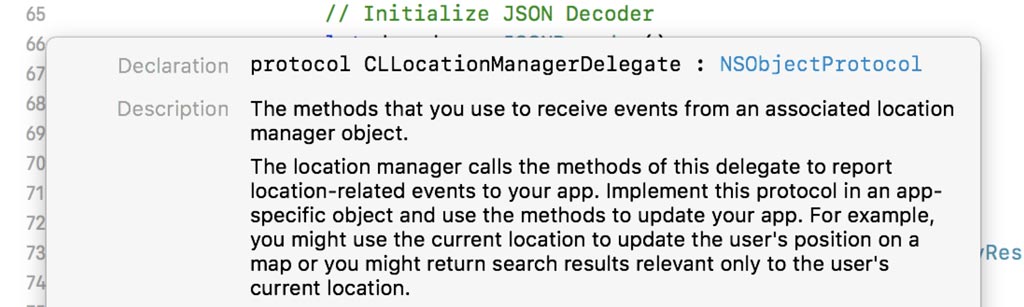
The compiler tries to help us by offering to add stubs for the required properties and methods of the NSObjectProtocol protocol, but that looks like a lot of work. There's an easy shortcut, though. Every class that inherits from the NSObject class automatically conforms to the NSObjectProtocol protocol hence the name of the protocol. That is the most straightforward and recommended approach to resolve the problem we're having.
import Foundation
import CoreLocation

class RootViewModel: NSObject {

    ...

}
Inheriting from NSObject has a few consequences. We need to prepend the initializer of the RootViewModel class with the override keyword, because NSObject also defines an initializer with that name.
Because we're overriding the initializer of NSObject, the superclass of RootViewModel, we need to invoke the implementation of the superclass in the initializer.
override init() {
    super.init()

    // Fetch Weather Data
    fetchWeatherData()
}
Fetching the Location of the Device
We fetch the location of the device when the RootViewModel instance is initialized by invoking a helper method, fetchLocation().
override init() {
    super.init()

    // Fetch Weather Data
    fetchWeatherData()

    // Fetch Location
    fetchLocation()
}
The implementation of the helper method is surprisingly simple. We invoke requestLocation() on the CLLocationManager instance.
private func fetchLocation() {
    // Request Location
    locationManager.requestLocation()
}
By invoking the requestLocation() method, the application asks the Core Location framework for the location of the device. Because it only asks the location once, it is the ideal solution for applications that only need the current location of the device.
Because the application requests the location of the device once, it isn't notified of location changes. That's an acceptable limitation for a weather application. By asking the location once, the application uses a small amount of energy. Using the location services of the device consumes quite a bit of energy and we don't want to drain the battery of the device.
Requesting Authorization
Earlier in this episode, I spoke about privacy and asking for the user's permission to access the location of the device. Let's take a closer look at permissions. It's a necessary aspect of working with location services.
The first time the application invokes the requestLocation() method the request fails because the application doesn't have the user's permission. The Core Location framework notifies the application through a delegate method, locationManager(_:didFailWithError:). We won't be handling the error. We print the error to the console. Error handling comes in later.
extension RootViewModel: CLLocationManagerDelegate {

    func locationManager(_ manager: CLLocationManager, didFailWithError error: Error) {
        print("Unable to Fetch Location (\(error))")
    }

}
The delegate of the location manager is also notified about changes of the authorization status through the locationManager(_:didChangeAuthorization:) method. This method is invoked whenever the authorization status of the application changes.
extension RootViewModel: CLLocationManagerDelegate {

    func locationManager(_ manager: CLLocationManager, didChangeAuthorization status: CLAuthorizationStatus) {

    }

    func locationManager(_ manager: CLLocationManager, didFailWithError error: Error) {
        print("Unable to Fetch Location (\(error))")
    }

}
This method is invoked the first time the application requests the location of the device. The authorization status isn't a boolean value. It is of type CLAuthorizationStatus.
After a clean install, the authorization status is equal to notDetermined. This indicates that the application hasn't prompted the user for their permission yet and that is the ideal opportunity to request the user's permission.
func locationManager(_ manager: CLLocationManager, didChangeAuthorization status: CLAuthorizationStatus) {
    if status == .notDetermined {

    }
}
We ask the location manager to prompt the user for their permission by invoking the requestWhenInUseAuthorization() method. As the name implies, we ask the user to allow the application access to the location of the device if and only if the application is in use, that is, in the foreground. That is more than sufficient for a weather application.
func locationManager(_ manager: CLLocationManager, didChangeAuthorization status: CLAuthorizationStatus) {
    if status == .notDetermined {
        // Request Authorization
        locationManager.requestWhenInUseAuthorization()
    }
}
If the user already granted the application permission to access the location of the device, then the authorization status is equal to authorizedWhenInUse. That is the level of access the application requested. If the application has access to the location of the device, we invoke the fetchLocation() method one more time.
func locationManager(_ manager: CLLocationManager, didChangeAuthorization status: CLAuthorizationStatus) {
    if status == .notDetermined {
        // Request Authorization
        locationManager.requestWhenInUseAuthorization()

    } else if status == .authorizedWhenInUse {
        // Fetch Location
        fetchLocation()
    }
}
There is one other option. What happens if the user doesn't grant the application access to the current location of the device? In that scenario, we pass an error to the didFetchWeatherData completion handler. Let's add a case to the WeatherDataError enum for this purpose.
import Foundation
import CoreLocation

class RootViewModel: NSObject {

    // MARK: - Types

    enum WeatherDataError: Error {
        case notAuthorizedToRequestLocation
        case noWeatherDataAvailable
    }

    ...

}
In the else clause of the locationManager(_:didChangeAuthorization:) method, we invoke the didFetchWeatherData completion handler and pass notAuthorizedToRequestLocation as the second argument.
func locationManager(_ manager: CLLocationManager, didChangeAuthorization status: CLAuthorizationStatus) {
    if status == .notDetermined {
        // Request Authorization
        locationManager.requestWhenInUseAuthorization()

    } else if status == .authorizedWhenInUse {
        // Fetch Location
        fetchLocation()
    } else {
        // Invoke Completion Handler
        didFetchWeatherData?(nil, .notAuthorizedToRequestLocation)
    }
}
The fetchLocation() method asks the location manager for the location of the device and that should give us the location we need to fetch weather data. The requestLocation() method returns immediately. Obtaining the location of the device is an asynchronous operation. The delegate of the CLLocationManager instance is notified when the location manager has a location for the device. It does this by invoking the locationManager(_:didUpdateLocations:) method.
extension RootViewModel: CLLocationManagerDelegate {

    func locationManager(_ manager: CLLocationManager, didChangeAuthorization status: CLAuthorizationStatus) {
        ...
    }

    func locationManager(_ manager: CLLocationManager, didUpdateLocations locations: [CLLocation]) {

    }

    func locationManager(_ manager: CLLocationManager, didFailWithError error: Error) {
        ...
    }

}
The second parameter of this method is an array of CLLocation instances. We safely ask the array for the first CLLocation instance.
func locationManager(_ manager: CLLocationManager, didUpdateLocations locations: [CLLocation]) {
    guard let location = locations.first else {
        return
    }
}
We won't be storing the location of the device because we only briefly need it to fetch weather data from the Dark Sky API. Let's pass the location as an argument to the fetchWeatherData() method.
func locationManager(_ manager: CLLocationManager, didUpdateLocations locations: [CLLocation]) {
    guard let location = locations.first else {
        return
    }

    // Fetch Weather Data
    fetchWeatherData(for: location)
}
This means we need to update the fetchWeatherData() method to accept a CLLocation instance. That isn't too difficult. The method accepts one argument, location, of type CLLocation. The location is used to create the WeatherRequest instance.
private func fetchWeatherData(for location: CLLocation) {
    // Initialize Weather Request
    let weatherRequest = WeatherRequest(baseUrl: WeatherService.authenticatedBaseUrl, location: location)

    ...
}
We also need to change the initializer of the RootViewModel class. We pass the default location as an argument of the fetchWeatherData(for:) method.
override init() {
    super.init()

    // Fetch Weather Data
    fetchWeatherData(for: Defaults.location)

    // Fetch Location
    fetchLocation()
}
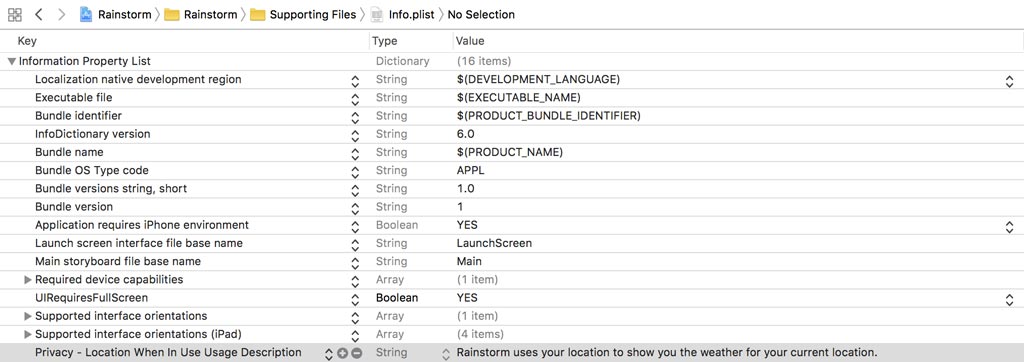
Before we can run the application, we need to take care of a detail that is often overlooked. The dialog that is displayed by the operating system, asking the user for their permission, should explain why the application needs the location of the device. This is better known as the usage description. The usage description needs to be defined in the target's Info.plist file.
Open Info.plist and add a new row. The key for the new row is Privacy - Location When In Use Usage Description. The value should be a string explaining why the application needs the location of the device.
Let's run the application and find out what we have so far. Build and run the application. The application prompts the user with a dialog you have probably seen dozens if not hundreds of times.
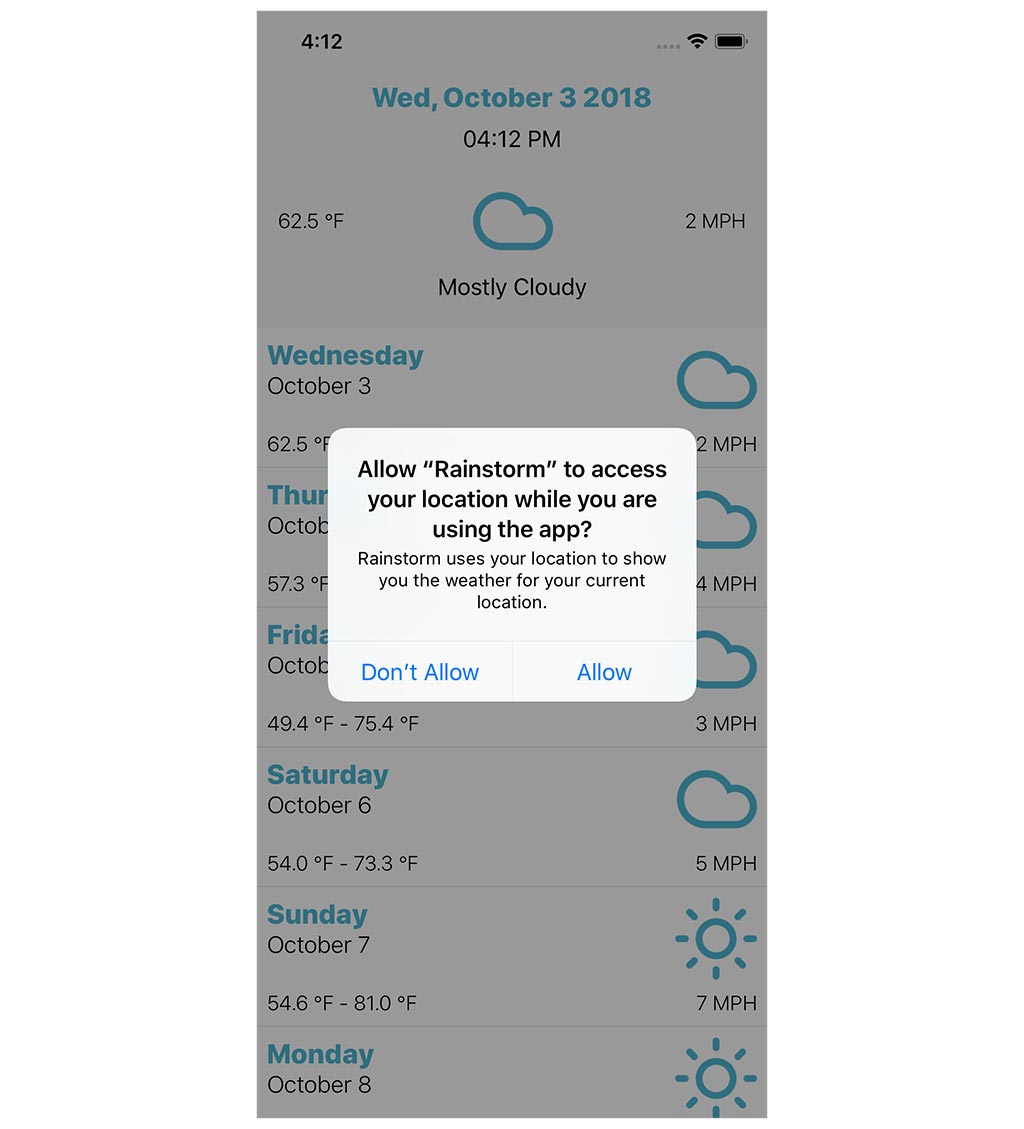
Tap Allow to test the happy path first. The Core Location framework fetches the location and passes it to the application. The application fetches the weather for the location and updates the user interface. This works seamlessly because we already laid the foundation in the previous episodes of this series.
Error Handling
What happens if the user doesn't grant the application access to their location? In that scenario, the application displays the weather for the default location. This isn't very useful, but there isn't anything the application can do. We shouldn't try to figure out the user's location through other means because the user explicitly indicated that they don't want us to know their location.
It doesn't end here, though. We should inform the user about their decision and, more importantly, tell them how they can allow the application access to the location of their device should they change their mind. This is important because an application can only ask the user for their permission once.
Notifying the user if the application isn't able to request their location is simple. The RootViewModel instance passes an error to the RootViewController instance. The root view controller only needs to handle the error and present a dialog. We first add a case to the AlertType enum in RootViewController.swift.
import UIKit

class RootViewController: UIViewController {

    // MARK: - Types

    private enum AlertType {
        case notAuthorizedToRequestLocation
        case noWeatherDataAvailable
    }

    ...

}
In setupViewModel(with:), we safely unwrap the error that is passed by the completion handler and inspect its value. We set the alertType constant and pass it to the presentAlert(of:) method.
private func setupViewModel(with viewModel: RootViewModel) {
    // Configure View Model
    viewModel.didFetchWeatherData = { [weak self] (weatherData, error) in
        if let error = error {
            let alertType: AlertType

            switch error {
            case .notAuthorizedToRequestLocation:
                alertType = .notAuthorizedToRequestLocation
            case .noWeatherDataAvailable:
                alertType = .noWeatherDataAvailable
            }

            // Notify User
            self?.presentAlert(of: alertType)
        } else if let weatherData = weatherData {
            ...
        } else {
            ...
        }
    }
}
In presentAlert(of:), we add a case for notAuthorizedToRequestLocation. We set the title and message constants that are passed to the initializer of the UIAlertController class. That's it.
private func presentAlert(of alertType: AlertType) {
    // Helpers
    let title: String
    let message: String

    switch alertType {
    case .notAuthorizedToRequestLocation:
        title = "Unable to Fetch Weather Data for Your Location"
        message = "Rainstorm is not authorized to access your current location. This means it's unable to show you the weather for your current location. You can grant Rainstorm access to your current location in the Settings application."
    case .noWeatherDataAvailable:
        ...
    }

    // Initialize Alert Controller
    let alertController = UIAlertController(title: title, message: message, preferredStyle: .alert)

    // Add Cancel Action
    let cancelAction = UIAlertAction(title: "OK", style: .cancel, handler: nil)
    alertController.addAction(cancelAction)

    // Present Alert Controller
    present(alertController, animated: true)
}
Remove the application from the device or simulator and run the application one more time. Because we started with a clean install, the application prompts the user for their permission to access the location of the device. If you tap Don't Allow, the application presents a dialog that informs the user about their decision and how they can change permissions in the Settings application.
What's Next?
Obtaining the location of the user's device and using it to fetch weather data isn't complicated if you break it down into simple steps.
There's one aspect of the implementation I'm not happy with. The RootViewModel class depends on the Core Location framework. This isn't an issue, but it's a dependency we don't control and that affects the testability of the RootViewModel class.
In the next episode, we extract the CLLocationManager class from the RootViewModel class. That will improve the testability of the RootViewModel class.